McCalls 5835 pattern for dresses, tops, and capris for a young girl produces a fun and pretty dress. But, the directions for sewing the bodice are notoriously difficult to follow. All over the blogosphere, sewists have been complaining about it. In conjunction with some sewing friends of mine, we have come up with better directions to make the bodice, so you don't have to toss out this pattern!
First of all, the pattern itself:
If you are a fan of Matilda Jane Flutter dresses, this is the pattern to get! The capris and shorts are also easy and fun to make for a girl. However, the bodice directions are not easy to understand and are time consuming to sew. So, I made a few changes.
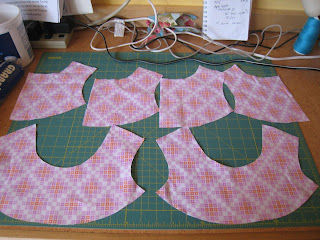
First of all, cut out your pattern as directed. Here are all the bodice pieces, two for the front, two each for both sides of the back. This dress has a lining and I am using the same fabric for both sides.
Next, I sewed each front piece to its corresponding back pieces at the shoulders.
See? This is now what they look like.
Iron the seams down, lay them on top of each other, right sides together, and pin. Do not pin the waistlines! You are not going to sew the waistlines for any of these pieces.
Just a reminder, do not sew the waistlines! Keep them open.
Now, sew where you have pinned, around the neckline and down both armholes. Remove pins and turn inside out. Turn it inside out through the front waist. Here it is halfway turned.
Use whatever tool you have to make your corners nice and pointy and iron flat. Like this:
Top stitch all the way around the seams you just sewed.
Sew the two back pieces together at the waist, like you see below: Just a wee stitch to keep the back together.
At this point, the fraying is starting to bother me so I like to serge the waist. I use a rolled edge. I will explain why later. Here it is with the finished waist seams.
Now, on to the sleeves! I like the rolled edge look. If you do not, you can do whatever kind of seam you prefer. The pattern calls for a folded and sewn edge. I pin the sleeve to the underside of the armhole, like so:
Now, on to the sleeves! I like the rolled edge look. If you do not, you can do whatever kind of seam you prefer. The pattern calls for a folded and sewn edge. I pin the sleeve to the underside of the armhole, like so:
Then, I flip it over and sew the sleeve on along the same line as the top stitching.
See, the pins are underneath!
Now, the sleeves is sewn on.
I now serge the corner, where the sleeve meets the bodice, so it is neat and tidy. This is why I used a rolled edge for all the bodice seams. It makes it all look neat and tidy when I am done.
Viola! The bodice is now finished.
And here is a sample of the finished product! This one has different sleeve fabric, but I followed the remainder of McCall's directions to produce the dress you see below. I did make one more modification and that was to sew the upper ruffle on top of the dress with two rolled edges.


Kathy, I actually purchased this pattern after too many hours of hanging out at Fb Handmade Dress Haven! And this tutorial is perfect, gives me extra courage to actually attempt sewing it. Such cute design I'm so in love!
ReplyDeleteKathy, I made this pattern for my 18month old Grandaughter and had trouble with it this really makes it look easy! Thanks so much for the detailed tutorial!! It will be a big help with my next dress!! Kathi
ReplyDeleteThanks for posting this! I have the pattern but have not yet tried to make it - this breaks things down very well!! Now I am not so nervous to try to make it!
ReplyDeleteSuper cute, looks nice and neat and simple!
ReplyDeleteNow where do you find time to sew with kiddos around? Do you have nice kiddos that entertain themselves or each other?
LOL Samantha. I have one kiddo in school all day and the other is blessedly easy to entertain. She will play or draw or watch a dvd a bit while I sew. I actually enjoy her company while sewing. I could not have sewn when both were home.
ReplyDeleteI wanted to add that while I do not sew the sleeves inside the bodice, this certainly could be done. I just like the neat and tidy bodice this way produces.
ReplyDeleteKathy, this is a great tutorial. I haven't sewed this dress, but I love the shape of the bodice. I might give this one a shot!
ReplyDeleteJenny
Seamingly Smitten
This comment has been removed by a blog administrator.
ReplyDeleteI am so happy you did this Kathy! I tried this pattern before I saw this and was CONFUSED! I don't know why they make patterns where construction makes it more complicated than necessary!
ReplyDelete